Monday 25 January 2016

Setting up and painting textures onto a landscape with Unreal

BTEC Games Design - Level 3

Setting up and painting textures onto a landscape with Unreal

By Dave Johnson 


Create a new folder called 'Landscape'. Within that, create three more folders: 'Materials', 'Resources', and 'Textures'.


Within your textures folder, import your graphics file. Make sure it is big enough and also a decent resolution suitable for monitors (72 dpi and a minimum of 1024 pixels by 1024 pixels ideally).


Within your materials folder, right click in the content browser and select 'Create new material'. Name it appropriately. Double click it.


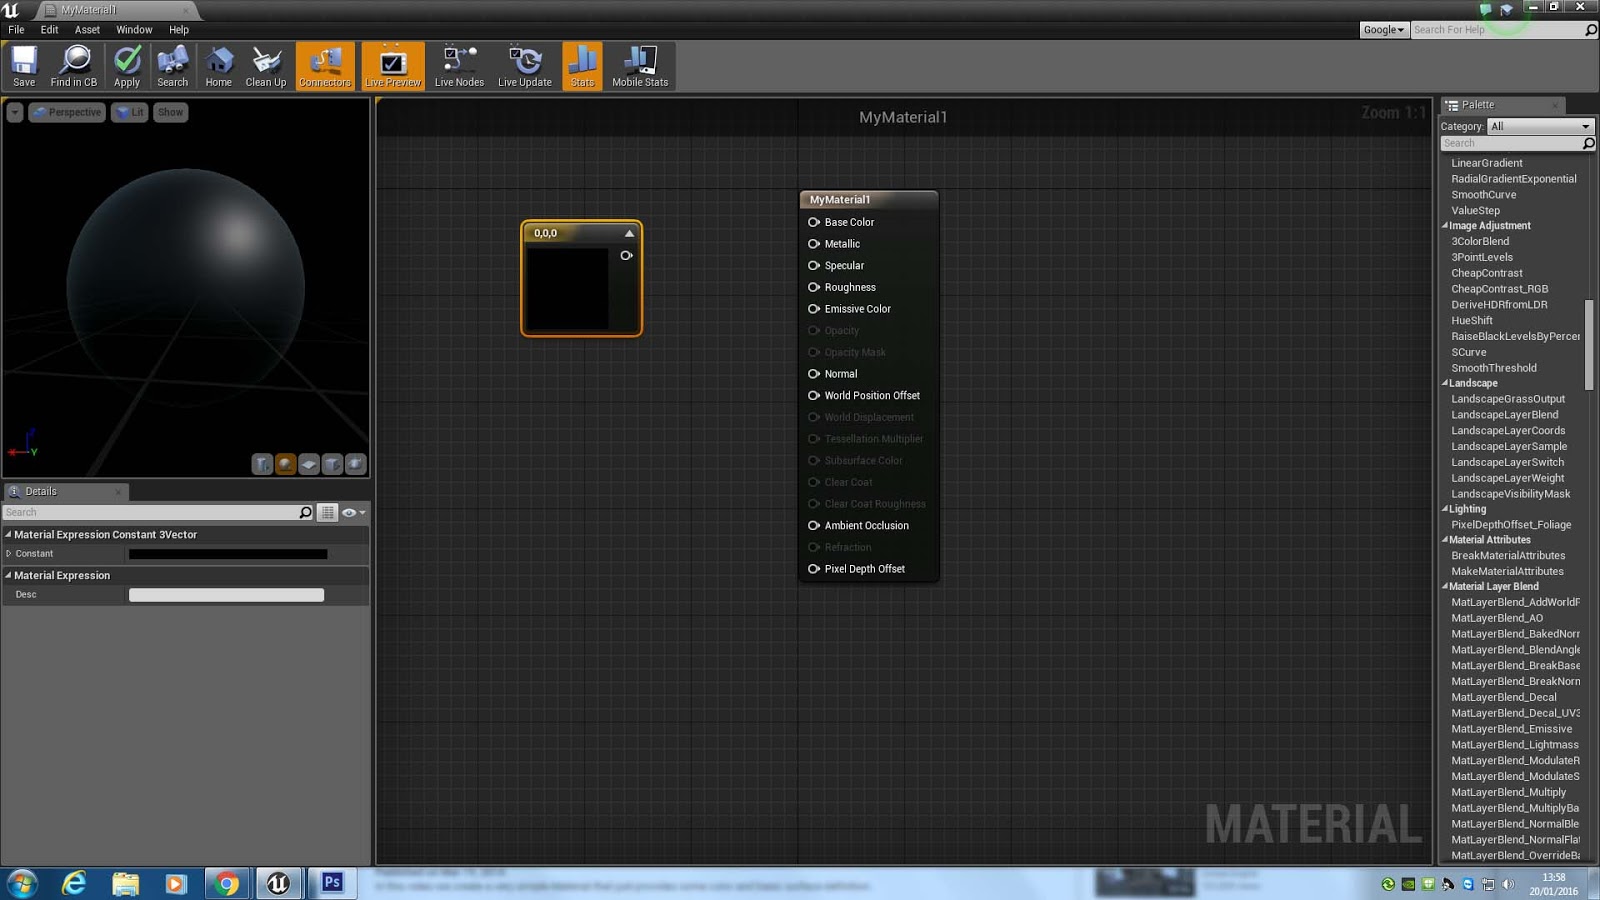
The blueprint editor should open with the above node inside it.


Under the Details tab, check 'Used with Landscape'


Right click and type 'Landscape co ordinates' into the search box that appears. Select texture coordinates. This maps the texture to the landscape model.


Drag in your graphic texture file from the Content Browser.


 Connect up the nodes as per the previous tutorials on creating materials and textures. Compile and save it.


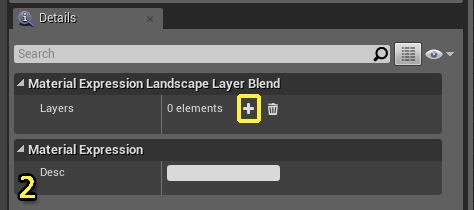
Right click in the graph and select  Landscape Layer BlendTo add Layers to it, you need to first select the node in the Material Graph and then in the Details panel, click on the Plus icon that is in-between the word Elements and the Trash Can icon. This icon is highlighted yellow in the image with the number two on it. Depending on how many textures you are using will determine home many Layers you will want to have.

Layer blends specify texture weight and opacity. You will need to set up two, layer blend base colours and layer blend normals. Base colours are our texture files and Normals are our bump maps to simulate roughness to the texture.

Below are some examples of how 3 different textures may be set up in both their base colours and normals.


Once the Layer Blend nodes have been set up, it is time to connect the Texture maps to them. When completed, you should have something that looks like the following:


This might look daunting but actually it's not. The coloured gradient box on the far right is your texture co ordinates. The next column of six boxes are all your texture files that have been dragged in from the content browser. You can then see the two layer blend boxes have had a layer fro each texture file set up within them. The person who created this picture also set up layer height layers, which is not necessary for our purposes and outside the scope of this tutorial. The usual metallic and roughness values have also been added in the third column, as per the previous materials and textures tutorials. The final 4th column contains the Landscape material node, which should be fairly familiar by now. Compile and save the blueprint.


We are almost ready to begin painting. Open the materials folder in the content browser and highlight it by clicking it once.


With the Landscape Material selected in the Content Browser, select the Landscape in the world by clicking on it. Then, in the Details panel, expand the Landscape section and look for the Landscape Material input.

Apply the Material to the Landscape using the Use Selected Asset from the Content Browser arrow icon (shown above).


You should get something similar to the above picture occurring.


We need to create three Landscape Layer Info Objects, one for each Texture that we wish to paint by doing the following:

  • First, make sure that you are in Landscape Paint mode.
  • On the Modes toolbar, under the Target Layers section, you should the inputs you set up in the layer blend node.
  • To the right of the names, there is an icon of a Plus Sign. Clicking on the Plus sign icon will bring up another menu that will ask what type of layer you would like to add. For this example, please pick the Weight-Blended Layer (normal) option.
  • When you select the Weight-Blended Layer (normal) option, you will be prompted with a pop-up box that is asking you where you want to save the newly created Landscape Layer Info Objects. Select the Resources folder that is under the Landscape folder and then press the OK button.
  • Now with the Landscape Layer Info Objects created and applied, we can begin to paint our Landscape.


Wednesday 20 January 2016

Creating a texture in Unreal


BTEC Games Design - Level 3

Creating a texture in Unreal
By Dave Johnson

Make sure you read the previous post 'Creating a material in Unreal'. If not, read it now before proceeding. Ok, if your're all set you can use the same editor node to create a texture and apply it to an object, as opposed to a simple colour. For this example a used a stone texture I found on google and changed the size of:


Stone texture


Stone texture bump map


Create a new folder in the Content Browser called texture. Click the large 'Import' button above the folder list. Navigate to your texture and import (just as a side note, make sure it is set to a square size in Photoshop, something like 72 dpi and 1024 x 1024 pixels). 


 Click the large 'Import' button above the folder list. Navigate to your BUMP MAP texture and import (just as a side note, make sure it is set to a square size in Photoshop, something like 72 dpi and 1024 x 1024 pixels). Go back to the 'Materials' folder and double click the material you created previously to go to the Blueprint editor. 


Minimise the Blueprint Editor so you can see the Content Browser. In the Textures folder, drag both the texture files you imported into a blank space on the Blueprint Editor.


Delete the colour node attached to Base Colour and attach your texture file to it instead. Do this by connecting the white pins. The view in the preview panel should update.


Connect your bump map texture file to normals 


Drag off the white pin to the left of your texture file node. Type 'texture co ordinates' into the search box that appears. Select texture coordinates and connect it like the picture above. This denotes how many times you want your texture to tile around the surface of your object.


By choosing this node and messing around with the Material Expression Co Ordinate values on the left, you can tighten up how many times the image tiles .


This is set to 4, 4, creating finer detail.


Creating a material in Unreal


BTEC Games Design - Level 3 Creating a material in Unreal By Dave Johnson
A material is basically a coloured paint that you can apply to an object in Unreal. You will need to tackle Blueprint material editors, which can at first seem confusing. However, understanding what each value means makes life simpler from the outset. So, here is what each refers to in the editor node:

  • Base Colour - Your colour, chosen from a colour picker. RGB value.
  • Metallic - (Set to 0 or 1) - 0 is metallic, 1 is non metallic.
  • Specular - How shiny a surface is - THIS WILL ONLY WORK ON NON METALLIC SURFACES
  • Roughness - (Set to 0.1 to 0.9) - How much the light is bounced around from a surface and how cleanly - e.g, imagine how shiny a ball of glass is compared to a ball of chalk)
  • Emissive - How much the material glows
  • Normals - Lumps and bumps, identified by a separate bump map texture.


Colours are termed as floating point colours. To simplify this imagine a pixel. A pixel is made up of:
  • R
  • G
  • B
  • A (Alpha) - transparency 0 (0 = 0% transparent) - 1 (1.0 = 100% fully opaque)


Some other terms I refer to:

  • Constant - Hold 1 and LMB
  • Constant 3 Vector (Simple RGB Colour) - Hold 3 and LMB
With an understanding of these terms, we can go about making a material colour that we can apply to an object:


In the Content Browser, create a new folder called 'Materials'


In the materials folder, right click in the Content Browser. Choose 'New Material'. Name it appropriately. Double click the material to open it in the Blueprint editor.


Here's that editor node! All the terms are above in this post, so consult those if you're not sure. For a simple material, we'll only need to use a few of them.


Hold 3 and left click in a space. The Constant 3 Vector field should appear.


Double click it and choose a colour. Drag a connecting wire from the white pin to the Base Colour pin.


Next, metallic setting. Hold 1 and left click in a space. The constants field should appear.
Set it to 0 or 1 in the value filed under Material Expression Constant on the left. Drag off the white pin and connect it to the Metallic pin.


Next roughness. Hold 1 and left click in a space. The constants field should appear.

Set it to 0.1 or 0.9 in the value filed under Material Expression Constant on the left. Drag off the white pin and connect it to the Roughness pin.


Next Specular. Hold 1 and left click in a space. The constants field should appear.


Set it to 0 or 1 in the value filed under Material Expression Constant on the left. Drag off the white pin and connect it to the Specular pin.


Click save and then click go back to the Unreal editor viewport. Choose your object then just drag your newly created colour onto it to change it's colour.

Next post, how to change your colour to a texture.


Wednesday 13 January 2016

Sculpting a landscape in the Unreal Engine - Part 1


I begin by creating a blank environment that has absolutely nothing in it. The first thing I do is choose the landscape button, which is the little mountain range symbol in the top left of the window.


From here, I am shown a set of options and values that determine how big I want to make my initial landscape. Each of the green squares in the picture above is called a quad. A quad represents a single area of land that can be edited or deleted.. I have set my landscape quads at 8 x 8.


Once this step is confirmed we are ready to begin sculpting. The landscape that was initially green turns grey and becomes rather like a large sheet of cloth that we can manipulate. We do this by using a range of brushes that pull peaks up, lower them, flatten them off or fill holes. We can alter the size and effectiveness of our brush to pick out small details or affect large areas. We can gently and subtly alter landscape features or create bold new ones.


For the zombie game I am making, I want the player to be confined within the bounds of the landscape. In the picture above I have started to create impassable mountains around the edges of the area. This should keep the player 'inside' the play area. The small canyon like area above is the starting area for the player. 


I continue to work my way around the edges of the quads, creating cliffs and mountains....


using different sized brushes to get different landscape effects.


If I hold shift and click the left mouse button with the brush tool, I can lower the landscape level rather than raise it. This is good for creating deep crevasses and valleys. 


I can use a particular brush setting to 'pinch' at the peaks I have modeled , which creates a sharp mountain range.


I do a quick test and run the level with my avatar character. This will tell me if there are any gaps that I can slip through and fall off the edge of the level. If there are, I need to alter this by raising the land level and keeping the player confined.


Whilst testing, I find a point where the land level is so steep I can't climb out if I jump down there.


To remedy this, I use the clay tool which fills holes with a virtual liquid.


This fills the hole and creates land layers that I can gradually build to make a more managable slope for my character.


After a little effort with the clay brush, I have a good slope and a potentially interesting gameplay feature.


The land looks a bit flat, so I gently pass over it with low strength brush to create bumps and ridges.


I really want to have more areas to explore than just the main play area, so I set about making slopes and hills to explore around the edges of the game.


I wanted at least one area that could not be seen from the large main play area. To do this I made a slope in the hillside and a large wall of mountains to hide it from view. 


Above is my finished model. Next, I want to begin texturing it.