Creating a human head in Maya
The first thing you will need to do is create 2 reference images for the front and side of the head. The two below are ones I created, but feel free to use them. For each, insert a plane polygon, then right click the shape with the mouse. Choose:
Assign new material.
Lambert.
In Common Material Attributes Panel, click the checkered box next to Colour.
Click File.
In File Attributes Panel, click the folder next to Image Name.
Navigate to your image and click OK.
It should appear on the plane.
In Channel Box click Rotate X 90 degrees and / or Rotate Y 90 degrees depending on whether you are setting up your front or side view.
Repeat for the other image .
Line both up with the grid so the grid centre line is down the centre of each image.
Pull both of the grid like this:

Select both by shift clicking them, then in the layers panel, right of screen, click the 'Create a new layer and assign selected objects' icon. It's the fourth one along, furthest right.
Next to the layer name that has been created there will be a blank check box. Keep clicking it until 'R' appears. This means the images are for reference and cannot be selected by accident


1) Begin by clicking the 'Create Polygon Tool' under the 'Mesh' and draw around one eye in your front view port. Extrude out the edges of this and delete the face that is covering the eye. Extrude the two edges nearest to the bridge of the nose and pull them to the centre of your grid. After this go to the Duplicate Special menu (click the little square to the right of the option) in the Edit drop down. You should be presented with something similar to this dialogue box:

Set it up exactly like this, with geometry type instance and x scale -1. Click Duplicate Special. This will create a reverse mirror image copy of what you have just done. The beauty of it is all changes and edits you make on one side will also appear on the other. Perfect for modelling a symmetrical face!
You should end up with something like the image 1), so continue to extrude edges downward to cover the nose. Just block stuff in for now, don't worry too much about detail.

2) Continue blocking in the area above the top lip by extruding edges, just as we have been doing so far. Follow the exact pattern of the mesh in the picture if you can.

3) Continue to extrude the muscles downward and around the mouth, and begin to create the shape of the mouth itself.

4) You should end up with something that looks like the picture above.

5) Continue onto the chin. Again, just block it in for now, don't worry about the detail or curvature of it.

6) Now take the edges of the nose and extrude them out. As much as possible you'll want 4 sided shapes, or quads making up each part of your mesh. 5 sided are ok sometimes and even 3, but don't go above 5 sides. If you right click on your object you'll have the option to select vertices. Do this, and select any two vertices you want to merge together. In the case of the image above, you can see that I have extruded out an edge and now want to make it part of the existing mesh by merging vertices. I would do that like this:

You can see I have two vertices in yellow and two in blue. I would select both yellow and click Edit Mesh > Merge. The same for blue. Once in a while, it helps to select every single vertex and just click Edit Mesh > Merge. This makes sure that each half of the image is stitched together by it's corresponding vertices right down the centre. Not doing this will have some weird effects later on, as the computer will think it's got two separate objects and will struggle to understand they are supposed to be joined together.

7) You should end up with an image like the one above

8) Now let's get that side view involved! Set up your viewports so you have just the front and side on screen. You can do this by going to the 4 port view and pulling the dividing line that runs across the screen centre upwards.

9) Begin the next part by concentrating on the centre most line of vertices that runs from the bridge of the nose to the chin. Choose the one that begins at the top centre of the face (bridge of nose) and pull it in the side view so it matches the profile of the drawing.

10) Continue onwards with that centre line of vertices and you should get something like this by the time you get to the chin.

11) A quick word of advice on the chin. At this stage they are the only vertex that you can pull up and down, to match your profile (see image above). All others, just pull them left and right. You may feel restricted by this and think your image isn't working, but trust me, patience is worth it eventually.

12) Continue onto the next line of vertices out. If you are unsure, look at the coloured chart below, after the central yellow vertices, it shows which group you should work on next. I work inwards to outwards - yellow, then orange, then red (only two of these), them magenta, blue, cyan, green, black, brown.

REMEMBER - WITH EXCEPTION OF THE CHIN, ONLY PULL VERTICES LEFT AND RIGHT.

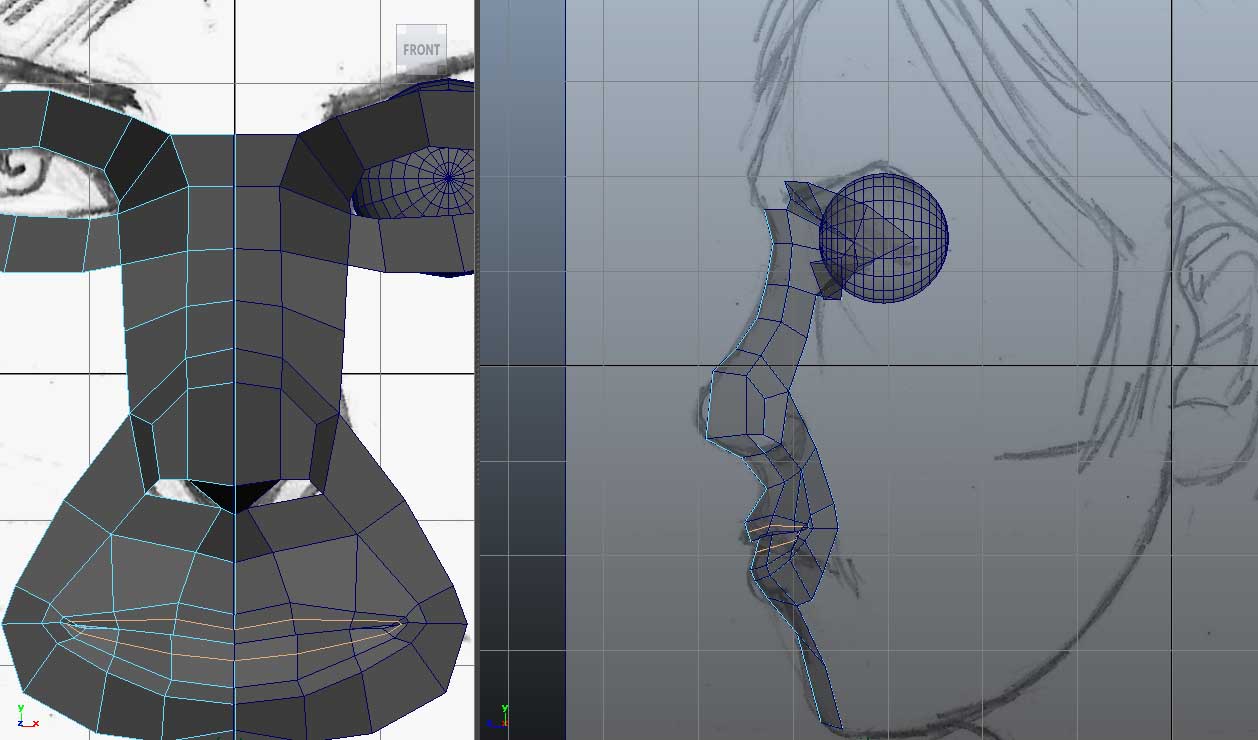
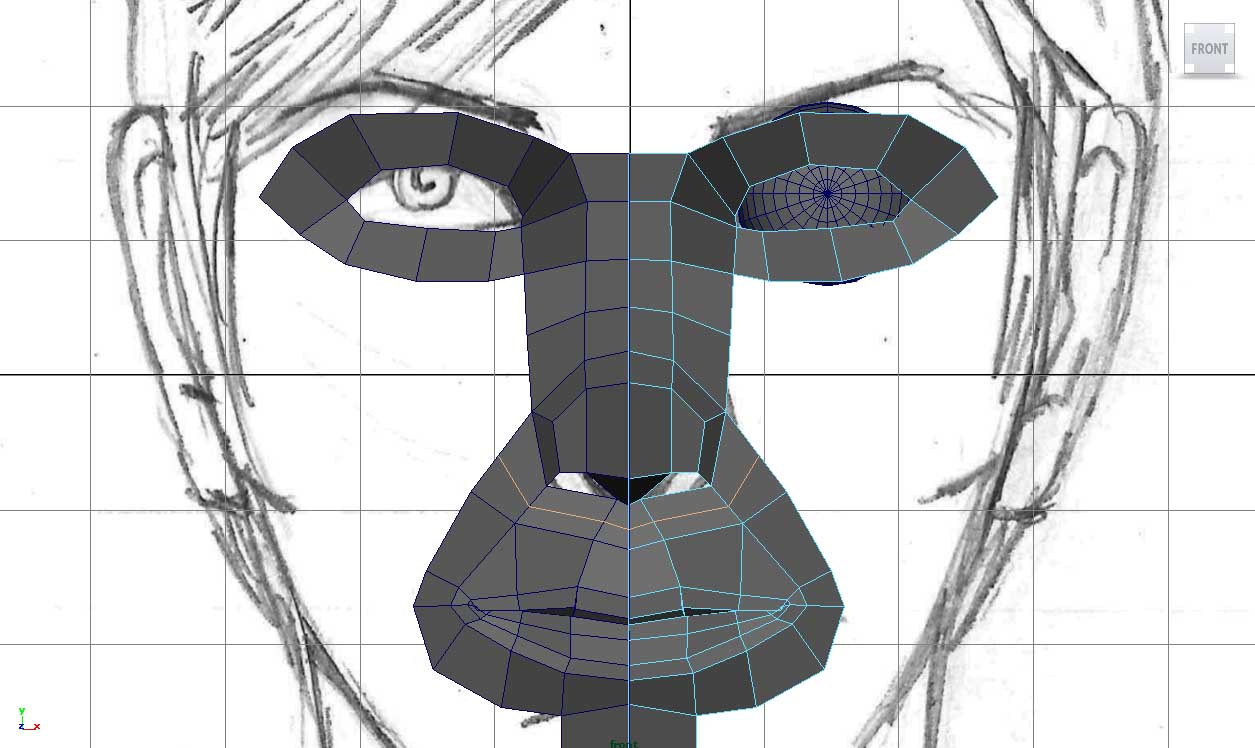
13) Following the contours and lines of your drawing, you should end up with something like the image above. Notice how the eye socket has begun to shape itself. To get it looking just right, let's drop in a polygon sphere for the eyeball.

14) In front view select the sphere, size it accordingly and hold J whilst rotating it. This is so we can use the polygon pattern in the sphere to give us a good idea of where the pupil would be.

15) In side view move it into place.

16) In perspective view, take the vertices around the eyeball and move them forward or back to follow the curvature of the ball. You want it so that no part of the eyeball can be seen OUTSIDE the face - we want it to sit snuggly inside.

17) In front view tweak the same vertices so they look good and cover the eyeball. Now we are going to work on the lips and mouth. Take all the edges around the inside of the mouth and extrude them in ward.

18) Pull them around so the bottom lip is bigger than the top lip. This is a trait in women's mouths, which we are obviously aiming to recreate.

19) Overlap the top lip over the bottom ever so slightly. Remember that whatever you do in the front view must also be taken care of in the side view, so adjust it accordingly. Use the screenshots for reference.
20) Now we want insert another edge loop in the mouth to round it out and add shape. Do this by clicking Edit Mesh > Insert Edge Loop Tool. Insert it where I have inserted mine in the picture above. With the edges or vertices this creates, pull them out to plump up the lips slightly, rounding them out.
21) Now we're going to add shape to the nose, be need a corresponding number of polygons. So add an edge loop under the nose like I have in the picture.

22) Extrude edges out and merge vertices together. At this point, we can also start thinking about the jawline. In side view choose the bottom most polygon edge and extrude it out towards the ear, like the picture in 23).

23) Extrude again at this point and pull up toward the ear.

24) Remember to move things in front and side view simultaneously.

25) Around the chin area, extrude edges and merge vertices to build shape to the face. Also think about the curvature of the chin and the way you arrange your vertices.

26) Keep adjusting and tweaking vertices in side view.

27) Round out the nostrils by selecting each edge around the nostril hole and adding an edge loop. This created more ploys, more vertices and more opportunity to add details to the face.

28) Any edge loop should run the length of the face. Those new ones below the nostril need to continue down the chin, so add one in using the insert edge loop tool. This will also help round out the chin.

29) Adjust as necessary in front or side view.

30) The nose vertices are still quite flat and uniform. Adjust them to create more of a realistic flow around the eye to nose bidge area. Do this by moving the vertices left or right in front view (NOT UP OR DOWN)

31) You've seen how edge loops add detail so add them in wherever you think may be appropriate, but in mind the polygon count and complexity of the mesh.

32) Take the top line of edges across the brow and extrude them upwards to begin to create the forehead.

33) Cover the nostrils by extruding the nostrils edges inwards then pulling them up into the inside of the nose.
Awesome blog. I enjoyed reading your articles.thanks for sharing Reshape Your Ears with Otoplasty in Order to Create New Look
ReplyDelete